Users
Bridge Admin Portal – Bridge Services LLC
Overview
The Users section manages everyone with access to the Bridge platform, including administrators, project managers, foremen, and safety officers.
Features
1. User Directory
Displays all registered users, including their:
- Name
- Role (Admin, Foreman, etc.)
- Tenant affiliation
- Status (Active/Inactive)
🔍 Viewing & Managing an Individual User
When you click on a user in the directory, you’re taken to that user’s profile page. This page is organized into three tabs — General, Access, and History — with an Edit button in the top‑right corner.
🧑 General Tab
The General tab contains personal details and employment information:
-
General Information
- First Name / Last Name – required fields.
- Email – used for login and notifications.
- Phone Number – optional contact number.
- Language – the user’s preferred UI language.
- Title – job title or role descriptor (e.g., Laborer, Supervisor).
- Photo – upload a headshot or ID photo (shows as “No photo” if blank).
-
Employment & Pay Rate
- Employment Type – e.g. Full‑Time, Part‑Time, Contract.
- Pay Rate – hourly or salary rate; used for payroll & billing reports.
- Pay Frequency – Weekly, Bi‑weekly, Monthly, etc.
- Billing Type – determines how the user’s time is billed (if applicable).
-
Badge Preview
- A mock‑up of the user’s ID badge showing your company logo and the user’s name/photo.
- This updates as you edit the photo or name.
You can click Edit to modify any of the above fields, upload a photo, or update pay rate and employment details.
🔐 Access Tab – Detailed Overview
The Access tab is where you manage a user’s permissions across the Bridge platform. It’s divided into three panels: Application Role, Organization Access, and Project Access.
🏢 Application Role
This section controls the user’s global (tenant‑level) role.
- Tenant Role Picker: A dropdown where you assign the user’s platform‑wide role (e.g., Member, Leader, Administrator).
- Changing this role affects what the user can do across all tenants (if they belong to multiple).
- View Permissions: Opens a modal listing all permissions granted by the selected role. Use this to review what the user can see or manage.
- Edit Role: Takes you to the role configuration page (if you have permission) where you can adjust the underlying permissions of that role.
*Example:
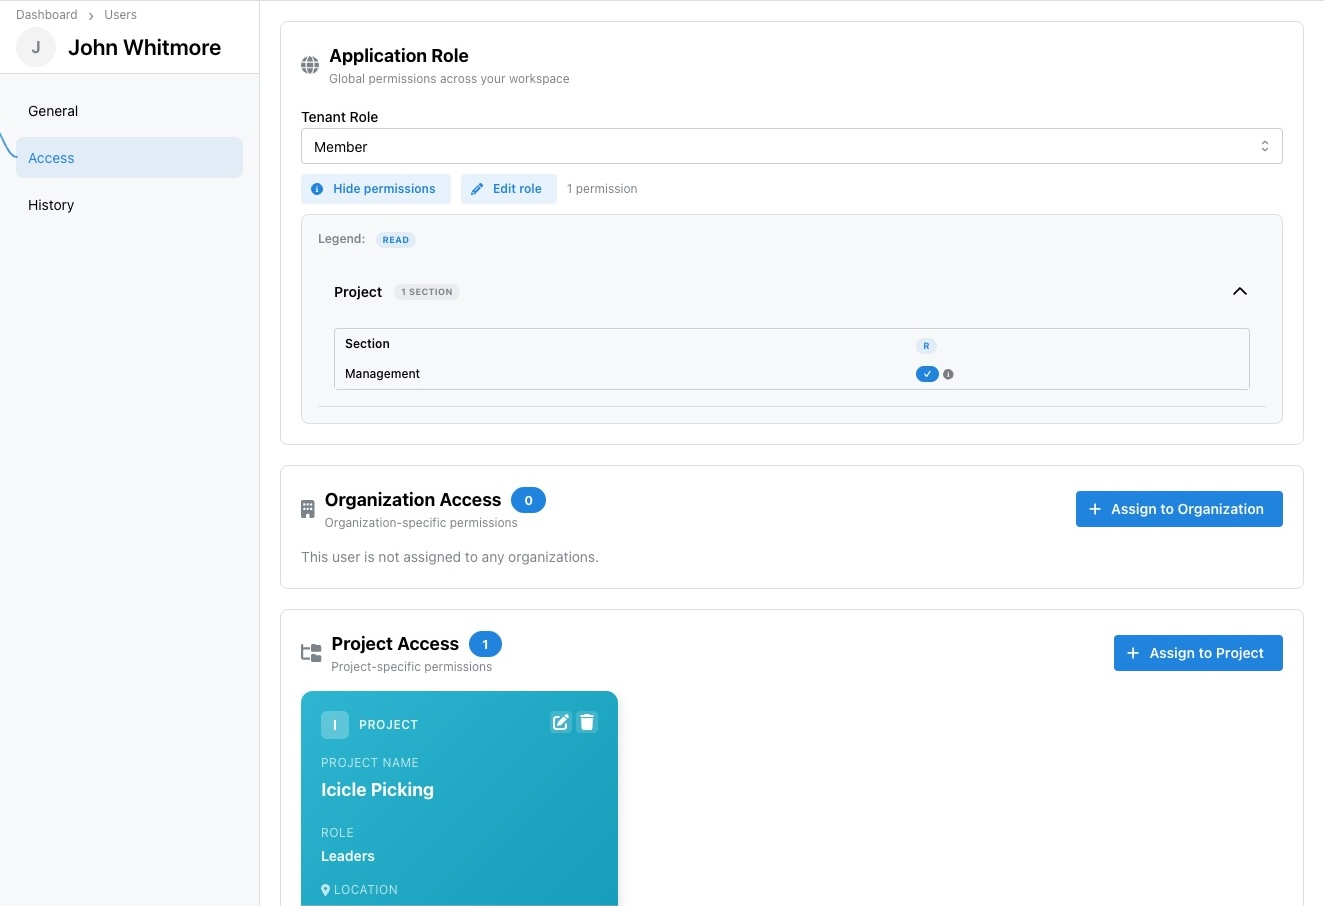
🏢 Organization Access
This panel lists the organizations (sub‑entities under a tenant) that the user belongs to and lets you assign new ones.
- Assign to Organization: Opens a search dialog where you can pick an organization and assign the user a specific Organization Role (e.g., Supervisor, Laborer).
- Organization Cards: Once assigned, each organization appears as a card showing:
- Organization name and description
- User’s role in that organization
- Quick action icons (edit role or remove user)
- If the user isn’t part of any organizations, a message such as “This user is not assigned to any organizations.” will appear.
📁 Project Access
This section handles project‑level assignments and permissions.
- Assign to Project: Opens a picker to select a project and choose a Project Role (Leader, Member, or a custom project role).
- Project Cards: For each project assigned, a card displays:
- Project name and client
- Role (e.g., Leaders, Member)
- Location (address) for quick reference
- Icons to edit (change role) or remove (unassign user) — typically a pencil/edit icon and a trash bin icon.
- You can add a user to as many projects as needed, each with its own role. Removing a user from a project here immediately revokes their access to project files, tasks, and time clock entries.
💡 Tips for Using the Access Tab
- Granularity: Use the Application Role to set the user’s baseline permissions, then tailor their Organization and Project roles for more granular control.
- Bulk Assignments: If you need to add a user to multiple projects or organizations, you can do so one after another without leaving this tab.
- Audit Changes: Any change you make here (assigning, removing, or changing roles) will appear in the History tab with a timestamp, creating an audit trail.
By using the Access tab, administrators can quickly see and adjust where a user is active, ensuring they have the correct level of access across the Bridge platform.
📜 History Tab
The History tab provides an audit log of the user’s activity and account events:
- Invitation Sent – Date/time the account was created or invitation email was sent.
- Password Resets – Records of password reset requests and completions.
- Role Changes – When roles are added, changed, or removed.
- Project Assignments – When the user is added to or removed from a project.
- Login Activity – Time stamps of the user’s last successful login (if logged).
This log helps administrators troubleshoot account issues and maintain compliance.
✏️ Editing & Deactivating
- Click the Edit button to update personal details, change a user’s email, upload a photo, or modify pay rates.
- To deactivate a user, change their status to Inactive; they will no longer be able to log in, but their records remain for auditing.
- You can also reset a user’s password from the Edit view if they have trouble logging in.
These additional details ensure administrators understand what information they can view and manage when inspecting an individual user’s profile. Feel free to include a screenshot of a user’s profile page:contentReference[oaicite:0]{index=0} to visually support this explanation.
2. Adding a User
- Click Add User.
- Fill out user details (name, email, role, assigned tenant).
- Set an initial password or send an invite link.
- Save to complete registration.
3. Editing or Deactivating Users
- To edit, select a user and update their details.
- To deactivate, toggle their status to Inactive; they’ll no longer appear in active lists.
Permissions and Roles
| Role | Description |
|---|---|
| Administrator | Full platform access including settings, billing, and user management. |
| Project Manager | Manage projects and documents within assigned tenants. |
| Foreman | Log work hours, upload safety reports, and manage field data. |
| Safety Officer | Oversee safety documentation and compliance forms. |
Common Workflows
Invite New Users
Reset a User Password
- Find the user in the directory.
- Click Edit and select Reset Password.
- A temporary password will be generated or emailed automatically.
Last Updated: November 12, 2025 (Managed by Bridge Platform Administration Team)